~ 24 ~

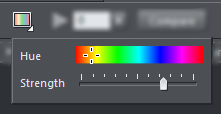
 The Photo Hue control, one the Photo Tool Enhance options, has a yellow-orange color selected with
quite a high strength value to change the pink flower color into a pale orange color.
Advanced Users
As with most photo editing features in Designer Pro this is all non-destructive editing. No pixels are harmed, damaged or altered when you’re using the color-select feature. This means you can adjust any aspect of the color-selected region or enhance values at any time. Just go back into the Photo Enhance Tool, click the Color-Select icon to switch color-select on, and, if necessary, click on one of the black color-select handles. Now you can adjust the handle, add more handles, or adjust the Enhance values. If you’re editing a photo as a Photo Document (which means just the photo on its own, not a page) and you save the JPG of the edited photo - you can still change the values as long as the master image is saved alongside the JPG. See the Help under ’Editing Photo Files’. So how does color-selection work? In Color-select mode, when you click on the image Designer Pro creates an ‘enhance bitmap’ containing all the pixels of the colors you have selected. This is overlaid on top of the photo (that forms part of the photo group). If you look at the Page & Layer Gallery and expand the Photo Group, or if you select inside on the color-select area (Ctrl+click), you’ll see there is a bitmap with ‘Enhance Transparency’. Enhance transparency is a special transparency type that adjusts the pixels of the image below. For example you can draw a rectangle, give it an Enhance transparency type, and now adjust any Enhance value, say brightness. Now anything, photo, vector graphics or text, under the rectangle is brightened.Color-select Summary
• In the Photo Enhance tool, , the color-select mode control at the right end of the InfoBar
  turns on color-select mode...
•
Now clicks on an image will select the color and closely related shades.
•
Subsequent adjustment of any Enhance slider will only affect the selected colors.
•
Additional clicks on the image add more colors to the selection.
•
Click-hold or click-and-drag on any color-select to preview the affected region as a checkerboard
pattern
•
Right-click on any color-select handle to delete one or all color-selection points.
•
If a photo has had color-select operations performed on it, you can see the control points by just
turning on the color-select mode switch, at the right end of the Photo Tool InfoBar
  •
Un-select the color-select mode
  to return to normal photo operation - enhance sliders will
now affect the whole image.


Xara Designer Pro X10 release notes


