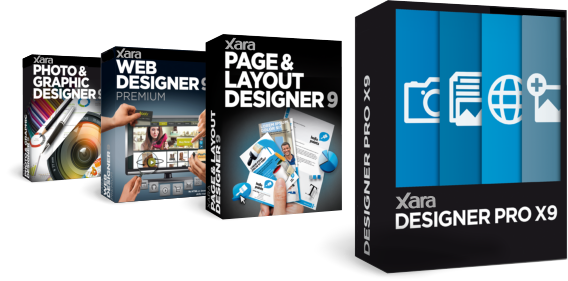
Xara Designer Pro X9
Xara Designer Pro 9 is the flagship product of a suite of creative applications consisting of: A photo and vector Illustration program:
Xara Photo & Graphic Designer
A page layout / DTP program:
Xara Page & Layout Designer
A website creation program:
Xara Web Designer
Pro X9 contains the full functionality, and more, of all
three products in a single program. (Note, unlike our
competitors Pro X9 does not consist of separate loosely
integrated programs). Customers can upgrade from any
of the individual packages to Pro X9 at any time.
A photo and vector Illustration program:
Xara Photo & Graphic Designer
A page layout / DTP program:
Xara Page & Layout Designer
A website creation program:
Xara Web Designer
Pro X9 contains the full functionality, and more, of all
three products in a single program. (Note, unlike our
competitors Pro X9 does not consist of separate loosely
integrated programs). Customers can upgrade from any
of the individual packages to Pro X9 at any time.
Release notes
This document should be read in conjunction with two other documents that detail the new photo and vector graphics features of Photo & Graphic Designer 9 and the new web features of Web Designer 9, all of which form part of this Pro X9 release. Photo & Graphic Designer release notes Web Designer 9 release notes This document therefore focusses on the additional, mainly text related, enhancements of Pro X9.
Click any of the links below to jump to the corresponding
description.
Multi-Column Text
Text Flow & Page Creation
Word Import & Export
64-bit
DTP for the web
New Logo Graphics
Multi-Column Text
Text Flow & Page Creation
Word Import & Export
64-bit
DTP for the web
New Logo Graphics


Xara Designer Pro X9
Release Notes

1


Multi-column text
All Xara Designer products support three types of text item you can place on the page, available via the Text Tool: 1. Simple text Just click on the page and type. Simple text has no bounds and continues off the page if you continue typing. You can use the Enter key to start a new line. 2. Text Columns Click and drag horizontally on the page to create the desired column width. Text is formatted into the column width and grows downwards unbounded. 3. Text Areas Click and drag diagonally to create a text area of the desired width and height (sometimes called a text box or frame). Text is cropped off the bottom of the box if it overflows, but you can link it to another text area to flow into.
Instead of creating multiple text areas manually and
connecting them up, Pro X9 (and Page & Layout Designer
9) introduces a direct, easier way to create multi-column
flowing text areas.
With a Text Area selected (either in the Selector Tool or
with the text cursor in the text), right click to display a
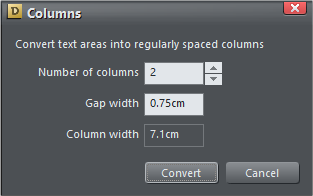
Columns.. menu option, or click this icon on the right
end of the Text Tool InfoBar , and the following dialog
is displayed:
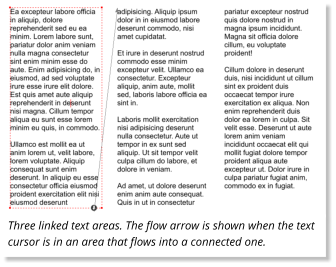
 This allows you to convert a single text area into multiple
linked ones. Or, if there are already multiple linked
columns in a set then you can adjust the column count.
Note: these multi-column sets are based on text frames
or boxes, and not ‘text columns’ (which have no lower
edge so cannot flow.)
This allows you to convert a single text area into multiple
linked ones. Or, if there are already multiple linked
columns in a set then you can adjust the column count.
Note: these multi-column sets are based on text frames
or boxes, and not ‘text columns’ (which have no lower
edge so cannot flow.)
Text Flow & Page Creation
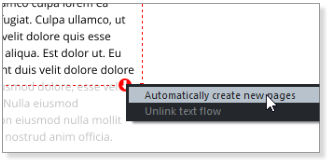
Pro X9 can now act like a word processor so that when text flows off the bottom of one page (or out of a text area) it can automatically create a new page (a copy of the previous layout) and flow text into this new page. When text overflows a text area you see a small red overflow arrow on the bottom edge of the text area. You can drag this to any empty text area to direct the text flow. Or just clicking it will show a short menu that allows you to set the automatic creation of new pages. Selecting this option will cause new pages to be created as text overflows. The new pages will contain a copy of the flowing text areas from the previous page. For example, if you have a page with 3 connected text area columns, as text overflows the last area a new 3 column page will be created.New Document Templates
There are new empty document templates available in the File New menu such as ‘A4 1-column’ or ‘US
Letter 1-column’ that contain one main text area
Xara Designer Pro X9
Release Notes
2

covering most of the page, set to auto-create a new page
when text flows off the end. So using these documents,
the program will act like a word processor and just
create new pages as required. If you are creating a multi-
page document, a brochure or report say, it is
recommended to start with one of these templates.
To make any of these templates multi-column just right
click and the select the Columns.. menu.
Save Template menu. If you select the Use as
default template check box, this template will be used
whenever you click the new document icon.
So this is an easy way to make a global change to all
copies of a text area.
Usage Note: The behaviour when using the Selector
Tool to change the dimensions of a text area has
changed in this release. Previously if you used the side
handles, it would squash or stretch the text contents. In
this release it only changes the dimensions of the text
container and not the contents. The exception is if the
text area is inside a group, then adjusting the aspect
ratio of the group using the Selector Tool will still change
the aspect ratio of the whole contents of the group.
right click
menu is available, with a selection of page number
styles.
menu provides an option to
Create your own templates
You can easily save your own templates by selecting the File Save Template menu. If you select the Use as
default template check box, this template will be used
whenever you click the new document icon.
Adjusting text area sizes
If you adjust the size of a text area (you can use the Selector Tool to do this, or in the Text Tool to drag on a corner handle) that is repeated on multiple pages e.g. it has been created using the auto-flow feature, you will be asked if you want to replicate the change across all similar frames.
So this is an easy way to make a global change to all
copies of a text area.
Usage Note: The behaviour when using the Selector
Tool to change the dimensions of a text area has
changed in this release. Previously if you used the side
handles, it would squash or stretch the text contents. In
this release it only changes the dimensions of the text
container and not the contents. The exception is if the
text area is inside a group, then adjusting the aspect
ratio of the group using the Selector Tool will still change
the aspect ratio of the whole contents of the group.
Page Numbers
With the text cursor in the text, a new Insert right click
menu is available, with a selection of page number
styles.
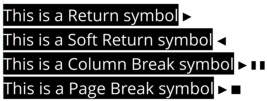
Page and Column Breaks
The same right click Insert menu provides an option to


insert a column or page break. Inserting a column break
will move the following text to the start of the next
column, which if there’s only one column per page, is the
same as to the next page. Inserting a page break will
move the following text to the start of the following
page.
If your document is arranged in a Double Page Spread
fashion (File Page Options dialog, and check the
Double-Page option) then you have an additional choice
of forcing a page break to be to the right side or left side
of the document.
A Soft Return, or line break is inserted with Shift+Enter.
This does not cause a new paragraph, but just starts a
new line, useful for bullet or numbered lists to start a
new line without a number or bullet.
Page Options dialog, and check the
Double-Page option) then you have an additional choice
of forcing a page break to be to the right side or left side
of the document.
Invisible Character Symbols
When you insert a paragraph return (using the enter key) or a page or column break, it puts an invisible break character in the text. These become visible when you select text and are shown like this:
A Soft Return, or line break is inserted with Shift+Enter.
This does not cause a new paragraph, but just starts a
new line, useful for bullet or numbered lists to start a
new line without a number or bullet.
Strikethrough
Version 9 brings a new Strikethrough text control, via this icon on the Text Tool InfoBar:
Word Import and Export
Included in this release are two new import /export converters for Microsoft Word .docx file format. You can import a .docx file by selecting File > Open or Import. Or alternatively simply drop a .docx file onto the title bar to create a new multi-page document with the correct text styles and graphics. To export as a Word .docx file select File > Export and select Word (.docx) as the export file type. Note there are some Xara features not supported by Word and vice versa, so there will be documents that cannot convert. However most normal Xara documents and Word document should convert with good fidelity.
Xara Designer Pro X9
Release Notes
3


Xara Designer Pro X9
Release Notes
4
Note: The Word import / Export is work-in-progress, and we
will continue to improve both. If you have a Word document
that doesn’t work, please submit a support ticket and
provide details (and include the problem document) at
xara.com/support.
64-bit version
Designer Pro X9 is the first version available as a 64-bit option. The main benefit is that it can take advantage of increased RAM memory available on modern computers. (32-bit Windows could never provide more than 3Gbytes of RAM to applications. With the increase in resolution and thus size of digital images, it’s relatively easy to reach that 32-bit limit.) This requires a 64-bit version of Windows 7 or 8. Most computers sold nowadays include 64-bit Windows. There are two trial versions available, 32-bit or 64-bit. You can install both and they will run side-by-side if required. The DVD delivered version also includes two installers. There are a few photo effects that are not available on the 64-bit version. The Photoshop plug-ins supported by Designer are not available in 64-bit versions, and some of the Live FX are not available. However the new Live FX (see Photo & Graphic Designer 9 release notes) are fully 64-bit compatible.Web Document
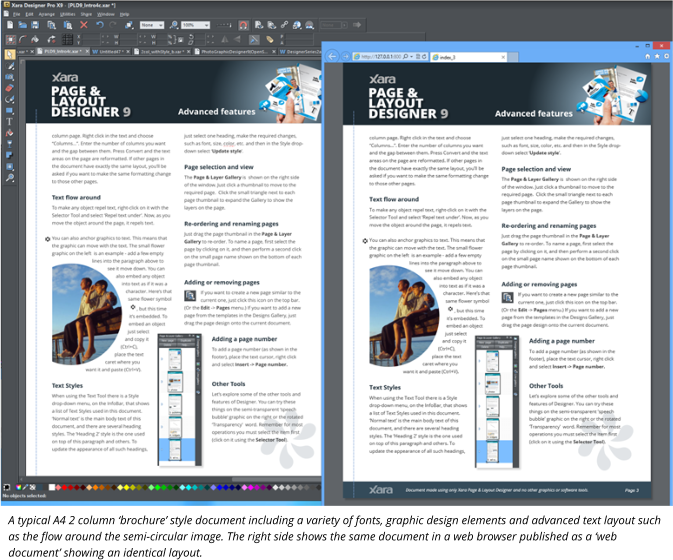
Publishing
Perhaps the most common way of disseminating ‘brochure style’ documents to a wider audience is via PDF, often published on the web as a download. PDFs have the advantage of completely accurate WYSIWYG (what you see in Xara Designer is exactly what you get and see in the PDF) and you have complete design freedom. This means you can use all the Designer Pro tools, and design any type of document. Websites and HTML have, by contrast, been severely restricted from a design point of view. It’s been difficult or impossible to implement advanced layouts involving multi-column text or ‘flow-around’ text effects and websites have provided limited resolution graphics and photos. Different web browsers wrap and flow text differently and that combined with limited font
availability, made it near impossible to ensure what your
design is what your customer sees.
Websites also require some method of navigating the
pages. Print documents and PDF have accurate
pagination and easy navigation.
This is why, even today, brochures, reports and any type
of document where the designer wants precise control
over the design, fonts, layout and pagination, are created
as PDF files. Designer Pro’s PDF export capability is
outstanding, and it’s easy to create high quality PDFs of
any document.
But PDFs have a downside. They require plug-ins or extra
programs to be installed to view. These can be slow, and
there are many poor quality PDF readers available. For
example Windows 8 includes a new Microsoft provided
PDF reader built-in, but it’s buggy and does not correctly
display some PDF files.
DTP for the web
Designer Pro X9 introduces a new way of publishing ‘print style’, or DTP-style documents that does not involve PDFs. These provide: • Font Freedom. The ability to use a vast range of fonts. Either use your desktop fonts (the fonts are automatically embedded, assuming the license allows) or any of the 600+ fonts from Google Fonts (this document for instance uses Open Sans family of fonts). Google Fonts use the world-wide Google content delivery network (CDN) to serve fonts, saving time and bandwidth. • High resolution photos and graphics. Typically websites were limited to 96dpi graphics and photos. Pro X9 includes automatic ‘Retina’ compatible hi- resolution 192dpi text and graphics. • Layout freedom: mix graphics and text, ‘anything anywhere’ on the page. Multi-column text stories, with flow-around irregular shapes and photos. • Pixel accurate WYSIWYG results. The document you design in Designer Pro is exactly what all viewers see, with the exact same fonts, word wrapping and pagination. • No plug-ins or separate readers required. Pages are created using HTML5. Your document is just a web document.
Xara Designer Pro X9
Release Notes
5
Compatible: Xara Web Documents are compatible with
all modern browsers, including mobile and tablet devices
where you can simply swipe to smoothly and rapidly
scroll through your whole document.
We believe Designer Pro X9 is the first product that really
brings ‘DTP to the web’.
PDFs still have their place: if you want to read offline or
have printed copies (printing from the web browser is
notoriously unreliable) or if you want to email
documents rather than sharing with the world, then
PDFs are best.
Designer Pro can export documents in either format.
Why not get the best of both worlds and publish a Web
Document version and have a PDF alongside for offline
use or printing?
How to export a Web Document
To preview what your document will look like just click the Preview icon on the top bar: or click the similar icon to preview just the
current page.
Select File > Publish Web Document.
You’ll be asked to sign into MAGIX Online World (to
publish to the free web space). If you want to publish to
your own servers, select the ‘Publish to an alternative
web host’ link on the Publish Dialog.
And here’s a link to a PDF version which, as you can see,
is identical in appearance.
Download Pro X9 Release Notes PDF


Xara Designer Pro X9
Release Notes
6
Free Web Space
If you do not have or do not want to use your web space Xara Page & Layout Designer includes 500Mbytes of free web space courtesy of MAGIX Online World. Designer Pro X9 includes an upgrade to the MAGIX Online World ‘Hosting M’ package which includes 2 GBytes of web hosting space and also a free top level domain name (e.g. yourcompany.com) and 5 mailboxes associated with that domain, free for one year.New Logo Graphics
Included with Pro X9 and Page & Layout Designer 9 is a new category of abstract generic company logos. You can find this in the Designs Gallery under: Page Elements & Widgets > Graphic Elements > Logos


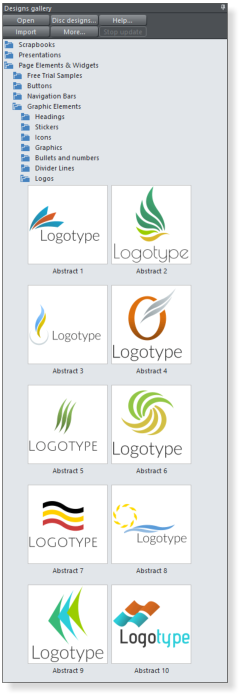
Just a few of the new generic logo graphics included in
the Designs Gallery. It’s easy to change the font and
colors to match your company style.