Photo & Graphic Designer 10 release notes
• Shadow & Highlight controls • Selective Enhance-by-color • SmartShapes • Insert menu • FontAwesome graphic shapes • Improved PDF, Word and RTF file import • Auto-rotation of digital camera images • Panorama stitching improvements • PhotoTools 2 plug-inNew Shadow & Highlight controls
There are two new Photo Enhance controls that appear on the Photo Tool InfoBar. The new Enhance Shadows control will lighten darker areas of photos without affecting the mid-tone or
lighter areas. This is more sophisticated than a simple brightness or levels adjustment in that it’s
selective about what dark areas it enhances. It typically avoids adjusting very small areas, e.g. single
dark pixels, and only adjusts larger areas of darker colors.
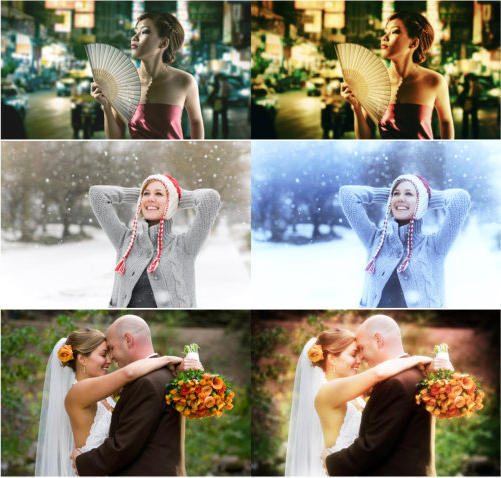
The original image is on the left. The center one has the had shadows enhanced with the new tool. The
right example has the brightness adjusted, which does make the shadows lighter, but results in the
The new Enhance Shadows control will lighten darker areas of photos without affecting the mid-tone or
lighter areas. This is more sophisticated than a simple brightness or levels adjustment in that it’s
selective about what dark areas it enhances. It typically avoids adjusting very small areas, e.g. single
dark pixels, and only adjusts larger areas of darker colors.
The original image is on the left. The center one has the had shadows enhanced with the new tool. The
right example has the brightness adjusted, which does make the shadows lighter, but results in the
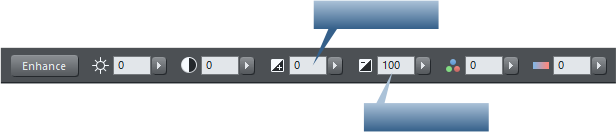
Enhance Shadows
Reduce Highlights

~ 1 ~


Photo & Graphic Designer 10 release notes
~ 2 ~
image looking washed out as some lighter and mid-tone shades have also been lightened.
Only the shadowed area has been enhanced, the mid and bright tones of the sky have not been
altered.
The highlights have been reduced on the example on the right, revealing more details of the quilt
pattern without affecting the brightness of other parts of the image.
Note neither function can bring back data that is missing from the original photo. For example it’s
common with many lower-end digital cameras that really bright areas will clip or ‘burn out’ (e.g.
clouds) and just show as pure white. The Highlights tool cannot bring back detail missing from
such clipped whites.
Only the shadowed area has been enhanced, the mid and bright tones of the sky have not been
altered.
Highlights control
The Highlights adjustment similarly can reduce the brightness of the very brightest parts of the image.
The highlights have been reduced on the example on the right, revealing more details of the quilt
pattern without affecting the brightness of other parts of the image.
Note neither function can bring back data that is missing from the original photo. For example it’s
common with many lower-end digital cameras that really bright areas will clip or ‘burn out’ (e.g.
clouds) and just show as pure white. The Highlights tool cannot bring back detail missing from
such clipped whites.
Selective Enhance-by-color
Photo & Graphic Designer 10 includes a new way to enhance areas of photos determined by the color.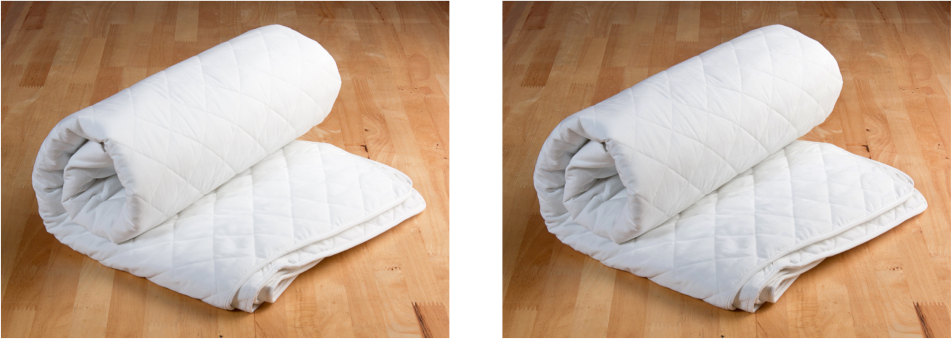
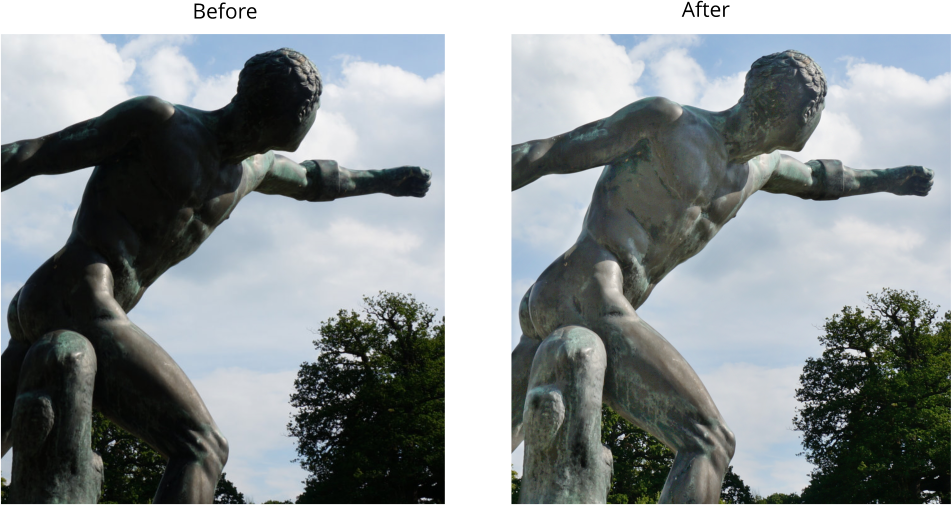
Photo & Graphic Designer 10 release notes
~ 3 ~
For example if you wanted to adjust only the blue sky, but no other colors in an image.
This new ‘enhance-by-color’ doesn’t just let you adjust the color or saturation value, but when you
select areas based on the color, you can adjust any of the P&GD Enhance options, e.g. you can adjust
the brightness, contrast, adjust the hue or tint, use the new shadows control, color temperature etc.
There is a new ‘color select’ icon at the end of the Enhance InfoBar:
The icon on the right end of the Photo Tool InfoBar allows you to select regions of the photo by color.
When you select this icon, you are now in ‘color-select’ mode and now further clicks on the image will
immediately select all areas of the photo of that color, or closely related colors. You will see a short
flash of a checkerboard pattern to indicate that you have selected some colors, and a new red ‘color
select’ control point will appear where you clicked.
Now if you adjust any of the Enhance controls on the InfoBar, it will apply those changes to the color-
selected areas only.
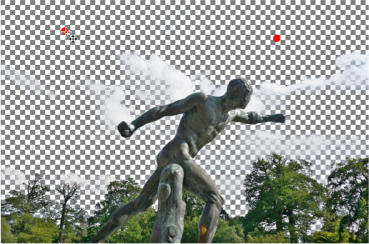
The color-select icon is highlighted, which means all clicks now select regions of the image based on the color
of the image at the click point.
Original image on the left. On the right example I have clicked on the sky where the red handle is shown.
You see a brief flash of checkerboard pattern, as shown, that indicates the region selected.
The icon on the right end of the Photo Tool InfoBar allows you to select regions of the photo by color.
When you select this icon, you are now in ‘color-select’ mode and now further clicks on the image will
immediately select all areas of the photo of that color, or closely related colors. You will see a short
flash of a checkerboard pattern to indicate that you have selected some colors, and a new red ‘color
select’ control point will appear where you clicked.
Now if you adjust any of the Enhance controls on the InfoBar, it will apply those changes to the color-
selected areas only.
The color-select icon is highlighted, which means all clicks now select regions of the image based on the color
of the image at the click point.
Original image on the left. On the right example I have clicked on the sky where the red handle is shown.
You see a brief flash of checkerboard pattern, as shown, that indicates the region selected.
Adjusting the range of colors selected
You can adjust the tolerance of the color-select process to include a wider range of shades and colors close to the selection point by using the drop down control that appears adjacent to the color-select icon when you have added any color-select control points.

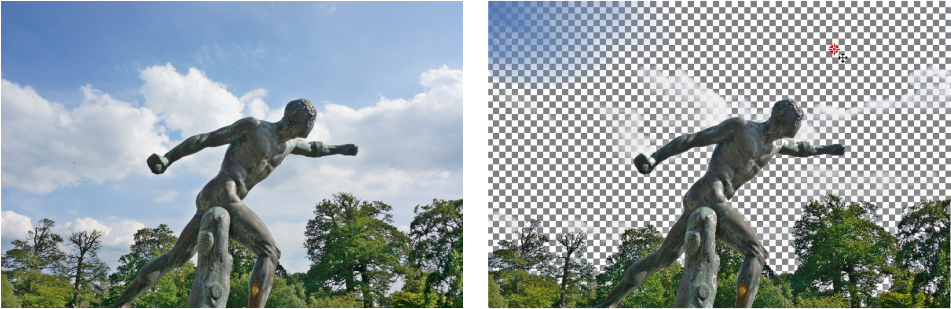
Photo & Graphic Designer 10 release notes
~ 4 ~
When you have a selected color-select point, click the right arrow icon, to display these controls to
adjust the tolerance (range of colors) and fade (how smooth or blended the edge colors are) of the
selected color-select control points.
To review or adjust the selection
To view the selection area, just click and hold on the color-select control handle, and it will show the affected region as a checkerboard. If you drag the color-select handle, it will re-calculate and show the adjusted region as you drag.Adding additional color-select points.
Instead of adjusting the color tolerance value, it’s sometimes better to add additional color-select points.
In this example the original clicked point was a relatively pale grayish blue, and it has selected quite a
wide range of similar blue-gray tones (which is probably what you want in this case), but you can see it
has not selected the deeper blue of the sky, top left.
To fix this simply perform another click in this area to add another color-select point. See below:
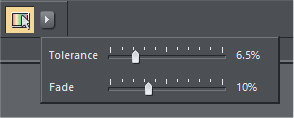
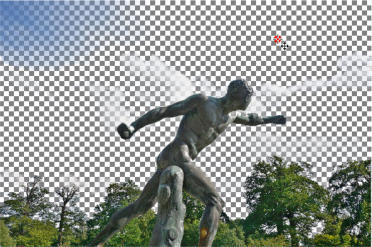
Photo & Graphic Designer 10 release notes
~ 5 ~
A second click has added a new color-select point and the checkerboard now
shows all shades of the sky are included.
Each new click will add a new color-select point and add the color under the point (and nearby colors)
to the selection.
When you have multiple color-select points the Tolerance and Fade controls apply to the whole
selection, not just to a given control point. Now that I have the whole sky selected, I can make other
adjustments using the normal Enhance controls.
Original image
More blue
You’re on Mars
Selecting separate areas of color
When any color-select handle is shown red, it means that selection region is active, and that additional clicks will add to that region. Adjusting any Enhance sliders will affect only this region. But suppose you want to select a different part of the image, that you want to enhance separately. In this case you can de-select the active color-select points by right clicking on a control point and choosing Deselect or pressing the Esc key once. Important: As long as the color-select mode is on, i.e. when the icon is showing selected like this
all clicks on the image will add a new color-select handle AND any adjustment of Enhance slider
values will apply only to the selected colors. This means that the normal click-drag short-cut for
the crop feature will not work.
Click the icon again to exit from color-select mode. Now drags will perform a crop, and adjusting

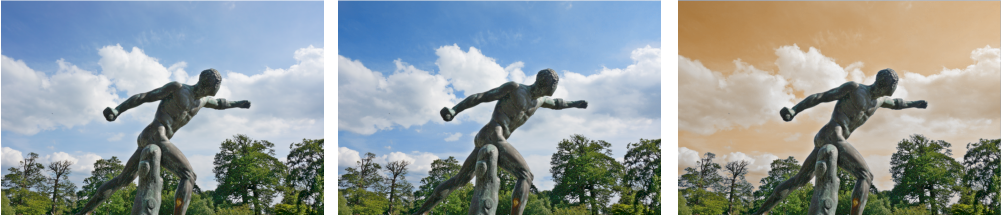
Photo & Graphic Designer 10 release notes
~ 6 ~
Enhance values will now apply to the whole image.
If the color-select handles are shown black they are not selected. Click on any handle to select it
(and any other handles that form part of this color selection). You can now adjust the position,
and any Enhance values that are applied to this color-selection.
which you can drag in
or out to resize.
Masking & Region Selection
Sometimes you will want to select colors in only one part of an image. In this case you can use the
Mask or Region selection tools to first mask, or select, the region you want to change. The easiest way
to do this is to use the Mask Painter tool to mask, that is protect areas, or Region Painter Tool to paint
over the area you want to select colors in, before using the Color Select feature.
So for example let’s say I wanted to to change the color of only one of these flowers. The color select
would normally select all flowers as they are similar colors. So, first, using the Region Painter Tool
I just paint a region around the flower I want to change. It doesn’t need to be very accurate. (See below)
Removing individual color-select points
Right-click on a color-select point and select Delete this color point.Selecting, editing or completely removing color-select
Because this color-select, like most photo editing operations in P&GD, is non-destructive, it means you can change, or remove any color selection at any time. To see the color-select points the photo must be selected, you must be in the Enhance Photo Tool and you must have the ‘color-select’ switch on (right icon on InfoBar). This shows all the color-select points. Click and hold on any point to review what area this point affects - this will also highlight any other points that are part of this color-select region. To remove the color-select completely, right-click on a color-select point and choose Delete Color Selection.Resizing color-select points.
The color selected is an average of the colors under the color-select point, so it’s sometimes necessary to resize this control point, especially when trying to select a color that occupies a very small area. Each color select point has four bi-directional arrows around it like this, which you can drag in
or out to resize.
Masking & Region Selection
Sometimes you will want to select colors in only one part of an image. In this case you can use the
Mask or Region selection tools to first mask, or select, the region you want to change. The easiest way
to do this is to use the Mask Painter tool to mask, that is protect areas, or Region Painter Tool to paint
over the area you want to select colors in, before using the Color Select feature.
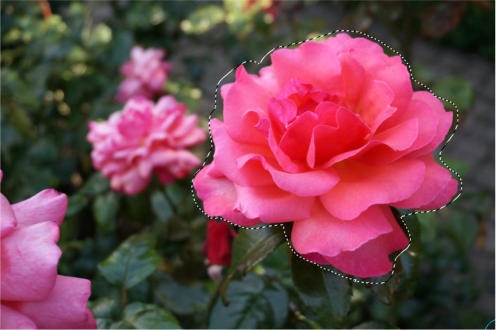
So for example let’s say I wanted to to change the color of only one of these flowers. The color select
would normally select all flowers as they are similar colors. So, first, using the Region Painter Tool
I just paint a region around the flower I want to change. It doesn’t need to be very accurate. (See below)


Photo & Graphic Designer 10 release notes

~ 7 ~
Once I have a region, then clicking to add color-select control points only selects the color inside the
region, so now I can easily re-color just the flower I want.
Here you can see I’ve had to add five color-select points to ensure I’ve selected all the various shades of
the flower. And then I just used the ‘Photo Hue’ control to adjust the color of the selection.
The region I painted around the flower ensures only the one flower is changed.
Photo & Graphic Designer 10 release notes

~ 8 ~
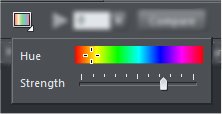
The Photo Hue control, one the Photo Tool Enhance options, has a yellow-orange color selected with
quite a high strength value to change the pink flower color into a pale orange color.
Advanced Users
As with most photo editing features in Photo & Graphic Designer this is all non-destructive editing. No pixels are harmed, damaged or altered when you’re using the color-select feature. This means you can adjust any aspect of the color-selected region or enhance values at any time. Just go back into the Photo Enhance Tool, click the Color-Select icon to switch color-select on, and, if necessary, click on one of the black color-select handles. Now you can adjust the handle, add more handles, or adjust the Enhance values. If you’re editing a photo as a Photo Document (which means just the photo on its own, not a page) and you save the JPG of the edited photo - you can still change the values as long as the master image is saved alongside the JPG. See the Help under ’Editing Photo Files’. So how does color-selection work? In Color-select mode, when you click on the image Photo & Graphic Designer creates an ‘enhance bitmap’ containing all the pixels of the colors you have selected. This is overlaid on top of the photo (that forms part of the photo group). If you look at the Page & Layer Gallery and expand the Photo Group, or if you select inside on the color-select area (Ctrl+click), you’ll see there is a bitmap with ‘Enhance Transparency’. Enhance transparency is a special transparency type that adjusts the pixels of the image below. For example you can draw a rectangle, give it an Enhance transparency type, and now adjust any Enhance value, say brightness. Now anything, photo, vector graphics or text, under the rectangle is brightened.Color-select Summary
• In the Photo Enhance tool,, the color-select mode control at the right end of the InfoBar
turns on color-select mode...
•
Now clicks on an image will select the color and closely related shades.
•
Subsequent adjustment of any Enhance slider will only affect the selected colors.
•
Additional clicks on the image add more colors to the selection.
•
Click-hold or click-and-drag on any color-select to preview the affected region as a checkerboard
pattern
•
Right-click on any color-select handle to delete one or all color-selection points.
•
If a photo has had color-select operations performed on it, you can see the control points by just
turning on the color-select mode switch, at the right end of the Photo Tool InfoBar
•
Un-select the color-select mode to return to normal photo operation - enhance sliders will
now affect the whole image.


Photo & Graphic Designer 10 release notes


~ 9 ~
SmartShapes
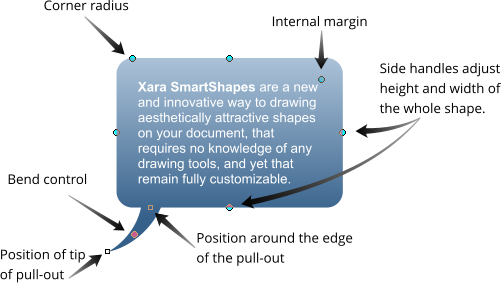
Drawing something as apparently simple as this arrow is really not that simple. Okay, it is pretty simple to draw a crude a straight arrow, using the Line tool (but even then you need to know and understand how to use the Straight Line tool and arrowhead controls). But to draw an aesthetically attractive arrow, like a graphic designer would, is difficult. In this case it has a tapering curved tail, a graduated fill color, a subtle bend to the arrow head shape. To draw this requires expertise, not just in the vector drawing tools, but in graphic design as well. And this is just a ‘simple’ arrow! Xara SmartShapes are an innovative new way to create a variety of such shapes, and more complex objects such as the speech bubble shown here. In all cases you can customize the main characteristics of the shape without using any different tools - you just drag on a few control handles to customize the shape, such as the curve of the fill arrow, or to re-position or adjust the curve of the ‘pointy part’ of the speech bubble. Another benefit is that the library of SmartShapes is internet delivered. Initially the selection is quite limited, but over time we will add to the range of shapes and objects in the catalog. So SmartShapes are an easy way anyone can add and customize a variety of vector shapes, and more complex objects such as text panels, without having to know anything about the vector shape editing tools.How to add a SmartShape
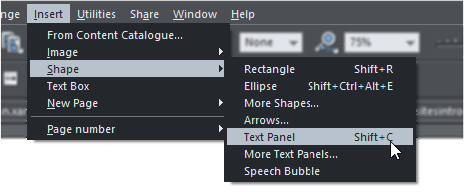
Select the main menu Insert Shape ... The most common shapes are available directly from this
menu (Rectangle, ellipse, text box etc). Additional collections of shapes, such as arrows and text panels
are available from the same menu but will open a new Content Catalog section.
How to edit a SmartShape
Either go into the QuickShape Tool, or just double click on the SmartShape, and you will see a
selection of control handles on the shape. Just drag them to adjust all the key characteristics of the
shape. Experiment by dragging the various handles to discover how the shape can be customized.
Photo & Graphic Designer 10 release notes


Xara SmartShapes are a new
and innovative way of drawing
aesthetically attractive shapes on
your document, which require no
knowledge of any drawing tools,
and yet they remain fully
customizable.
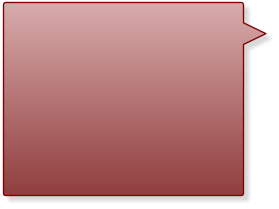
Xara SmartShapes can be
customized by just dragging on a
few control handles around the
shape. So for instance this is the
same speech bubble Smart-Shape
as above, just altered slightly.
What’s more it grows as you add
more text.


~ 10 ~
Here are the control handles of the Speech Bubble SmartShape.
The Insert > Shape menu has top level items of the most common shapes. The items with ellipsis ...
indicators will open the Content Catalog on a wider range of items of that category. Some of these are
SmartShapes, including this ‘Text Panel’.
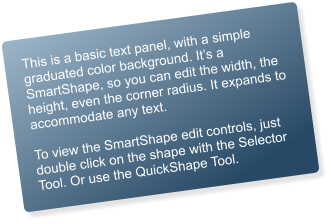
Tip: The benefit of the SmartShape text panel,
compared with previous ways of creating
automatically stretchy text panels, is that it’s easier
to adjust. Secondly you can rotate the panel using
the Selector Tool in the usual way, and it remains
New Insert menu
There’s a new top level Insert menu that makes it easier (a more discoverable way) to add common items to the page.
The Insert > Shape menu has top level items of the most common shapes. The items with ellipsis ...
indicators will open the Content Catalog on a wider range of items of that category. Some of these are
SmartShapes, including this ‘Text Panel’.
Tip: The benefit of the SmartShape text panel,
compared with previous ways of creating
automatically stretchy text panels, is that it’s easier
to adjust. Secondly you can rotate the panel using
the Selector Tool in the usual way, and it remains
Photo & Graphic Designer 10 release notes
~ 11 ~
Photo & Graphic Designer 10 release notes
editable and stretchable at any angle.
You can change the color of the panel by dropping
a color on the object, or just bring up the color
editor. To adjust the grad fill, click on it with the Fill
Tool.
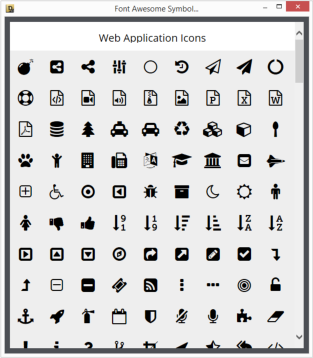
Font Awesome Graphic Shapes
There is a popular font called ‘Font Awesome’ that contains over 400 high quality symbols, icons or generally useful graphic designs. This was created as a font as a way of using such symbols in web pages. Like all fonts, the shapes are resolution-independent vectors. So we have included the font, and an easy way to view all the symbols, as a way to incorporate the symbols either as a font in text or as raw vector graphic. Select the menu Insert > Font Awesome Symbol, to view the picker. Scroll down to view all the symbols. Just tap a symbol to insert it into the current document. If you have the text caret in some text (in the Text Tool) and you insert a symbol, it will insert this as a font character, at the same size as the surrounding text. If you select the Insert option in any other tool, it will insert a vector graphic version of the symbol in the center of the page view. The benefit of being vector is that the graphic can be scaled by any degree and remain pin sharp, and you can apply any normal graphic effect such as graduated color fills, shadows etc,. So that’s a thumbs up...
~ 12 ~
Photo & Graphic Designer 10 release notes
Improved PDF, Word, and RTF file import
This release makes significant improvements to PDF import. PDF files containing embedded fonts now import perfectly, using the outlines of the embedded fonts, but remaining as editable text. Note, many PDF files contain embedded font subsets. In this case only the visible characters used in the document are included in the font. This is done to reduce the PDF file size. But a consequence is that if you edit the text and use any character that is not included in that subset, it will appear in the wrong font. The only solution to this is to change the font. Text Editability. The PDF file format was never designed to be an editable format, but a print-only or read-only format. However this release includes considerably enhanced ‘text re-construction’ algorithms, making it possible to more easily edit almost all PDF files. Improved Word import You can now open Microsoft Word files, in both .doc and .docx format, and it provides improved, more accurate page layout. When importing a .doc file you may be asked to download an additional component from Microsoft servers. Improved RTF import This release also includes enhanced RTF text format import. This format is used by Word and other text editor programs.Auto-rotation of digital camera images
An increasing number of digital cameras and phone cameras (including all iPhone and iPads) no longer rotate the image in camera to ensure the JPG file appears the correct way up (e.g. when you take a picture in portrait orientation). Instead they export the JPG file in whichever orientation you take the picture, and append an orientation flag with the picture. In our view this is a considerable step backwards, because it means all software now has to detect this orientation flag and rotate the image so it appears right-side-up, whereas previously, when this rotation was done in-camera, the JPG files were always correct.
~ 13 ~
Photo & Graphic Designer 10 release notes
Windows 8 file explorer and photo viewer do correctly re-orientate images, but Windows 7 and earlier
did not. Which meant that pictures taken with iPhones, as an example, often appear the wrong
orientation, often upside-down, when viewed on Windows 7.
This latest V10 release includes this auto-rotation fix so such images are automatically re-orientated
when opened or imported.
You no longer need to arrange images left to right prior to panorama creation. It automatically detects
where and how multiple images should be stitched together. Also the resulting stitched image quality
has been improved to provide better image alignment and correction for lens distortions.
Panorama stitching improvements
The built-in panorama stitcher has also been improved.
You no longer need to arrange images left to right prior to panorama creation. It automatically detects
where and how multiple images should be stitched together. Also the resulting stitched image quality
has been improved to provide better image alignment and correction for lens distortions.
PhotoTools Plug-in
Magic Bullet PhotoLooks2 is a powerful and flexible plug-in (previously sold by Red Giant for $199) that will be bundled with all copies of Photo & Graphic Designer 10. You can use the PhotoLooks tools and
~ 14 ~
Photo & Graphic Designer 10 release notes
their detailed controls to create your own custom effects, but it also includes over 100 ready made
effects inspired by commercial projects, from wedding vignettes to popular cinematic looks.
This is a pretty sophisticated program in its own right, so rather than reproduce the instructions in this
document, you can find the full PhotoLooks help here.
This document, all graphics, photos and text layout was created entirely in Xara Designer Pro and published
online as a ‘Supersite’ document.